On your Voice Appointments page you can update the settings for all your appointment-related Voice messages. From the tabs across the top of the page, you can select the message type you wish to edit.
Please note: the phone number displayed on the patient side when a call is received will show as your office phone number in General Settings. If you have multiple locations, you can manage the phone numbers separately. Click here to learn more.
Selecting reminder type
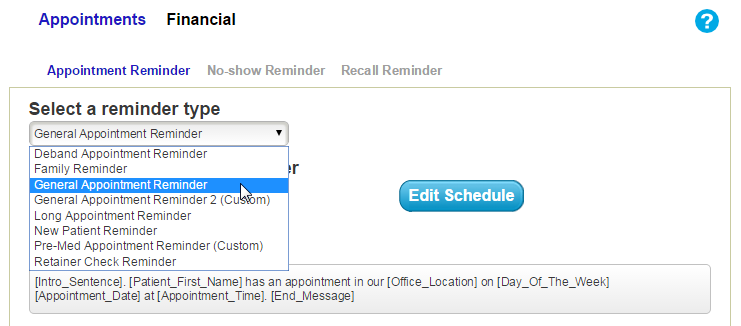
The top of the Appointment Reminder page has a drop-down menu that allows you to select the desired reminder type. There are six standard reminder types available, though any custom reminders you create will also appear in this list. Selecting a specific reminder will reload the page with the information for that reminder.

Once the page has reloaded, you will see the name of the reminder displayed at the top of the window. Below this are the radio buttons to enable or disable that reminder type. Clicking on the Edit Schedule button will allow you to choose when to send phone call appointment reminders; see below for more details.
Message Body
Next on the page is the Message Body. This is the recorded message that plays during the call for that reminder type. While the Message Body for the six standard reminders cannot be changed, you can request new reminders from the Voice Settings page.

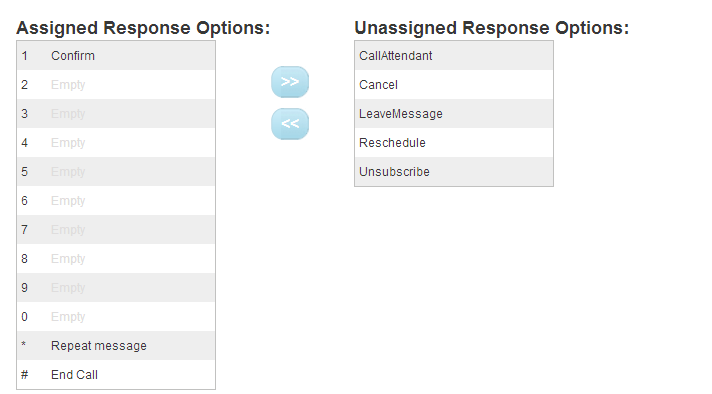
Below the Message Body, you will find the response options available to your patients. The Assigned Response Options column lists the options that have been selected for patients to use during that particular call. The number next to the option is the corresponding number they can press at the end of their call.
The Unassigned Response Options column are the options that have not been selected for patients to use for this reminder type. See below for more information on adding and removing response options.

For an example of a Voice Appointment Reminder, click here.
If you would like to hear how the message will sound to a patient, you can use the Test Call button. Clicking on this button will open a new window where you can enter the phone number to which you would like the call sent. Simply enter the number and click the Call button.
When you are finished updating your reminder, be sure to click on the Save button to save your changes.
Appointment Messages
Appointment Reminder
There are six standard Appointment Reminders, each with a different recorded message, that you can assign to different appointments based on their procedure code. Viewing the Message Body field for each reminder will show you the exact content of the recording.
- Deband Appointment Reminder - A message specifically for debanding appointments
- Family Reminder - Recording for use with family appointments
- General Appointment Reminder - A standard appointment reminder
- Long Appointment Reminder - Appointment reminder for longer appointments
- New Patient Reminder - Reminder for new patients to bring in their paperwork
- Retainer Check - Reminder to bring retainer or appliance to appointment
No-show Reminder
The Voice call for a missed appointment contains an additional field that allows you to choose the time of day to send the call.

Recall Reminder
You can configure up to two Voice Recall Reminders using the fields at the bottom of this page. The recall appointment date comes from your practice management system. This reminder is sent relative to that date, according to the schedule set here.

Editing reminder schedule
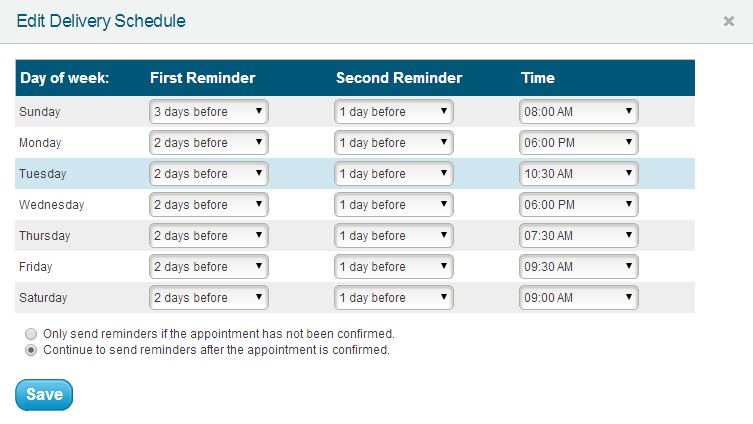
At the top of the Appointment Reminder page, you will find the Edit Schedule button that can be used to set or change the schedule used for your Voice reminders. When you click on the button, a new window will open with your current reminder schedule. The Day of week column refers to the day on which the appointment is scheduled, and the options for each reminder are relative to this day.
An appointment schedule for Monday, with a First Reminder set for “2 days before” will result in a Voice reminder call on Saturday. The Time field allows you to choose the time of day to make the call.

Editing Response Options
At the end of each Voice call, your patients will be presented with a series of Response Options that allow them to confirm their appointment, leave a message, or unsubscribe, among other options. The Response Options for each reminder type can be configured from the settings for that call.
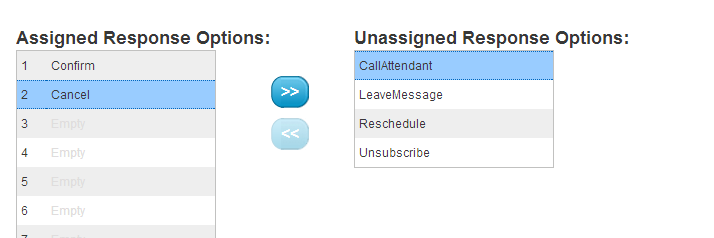
In the Assigned Response Options column, you will see a list of currently configured options for that call type. Using the “arrow” buttons, you can assign or unassign these options as you desire. To assign an option, simply click on it in the Unassigned Response Options column, then click on an available slot in the Assigned Response Options column.

Click the “arrow” button to move the response option from the Unassigned Response Options to the Assigned Response Options.

You can change the number to which a response option is assigned by moving it from the Assigned column to the Unassigned column. Then you can choose the new number for that response and re-assign it, using the “arrow” keys to move it back to the Assigned column.
 Looking for more information? Check out these Related Pages!
Contact our Member Services team at 866-537-8272, Monday - Friday 6 AM to 4 PM Pacific Time.


